会话页面
会话页面即应用程序中的聊天页面,主要由消息列表和输入区两部分组成。Global IM UIKit 提供默认的会话页面 Activity 类和基于 Fragment 类实现的会话页面。
- 基于 Activity:Global IM UIKit 默认提供的会话列表
ChatActivity。在 SDK 内部页面需要跳转到会话列表时,将跳转到默认的会�话列表 Activity。 - 基于 Fragment:您可以在应用 Activity 中集成 Global IM UIKit 提供的会话列表
ChatFragment,即自定义会话列表 Activity。注意,您需要将自定义会话列表 Activity 注册到 Global IM UIKit SDK 中,以替换 Global IM UIKit 默认的会话列表 Activity。
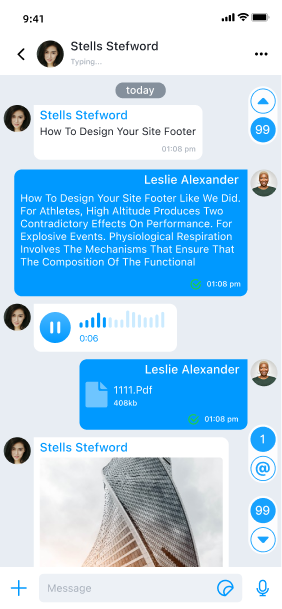
会话界面
会话界面一般由三个部分组成:导航栏、消息列表、输入区域。
会话页面结构
- ChatActivity:给
ChatFragment提供装载容器,没有具体实现。 - ChatFragment:绑定
ViewModel以及页面中的各个组件 Component,并给组件提供数据源的能力。 - ChatModule:负责
ChatFragmentUI 展示,并初始化当前页面的各个组件。 - ChatViewModel:提供会话列表页面的数据源以及所有操作的接口。
会话列表页面组件
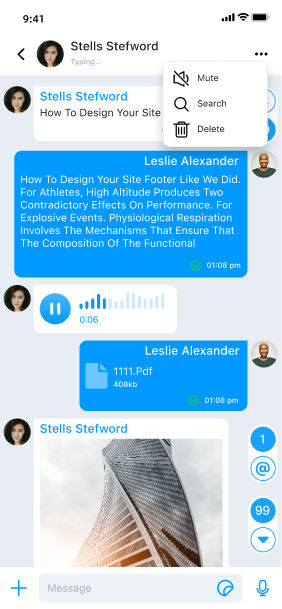
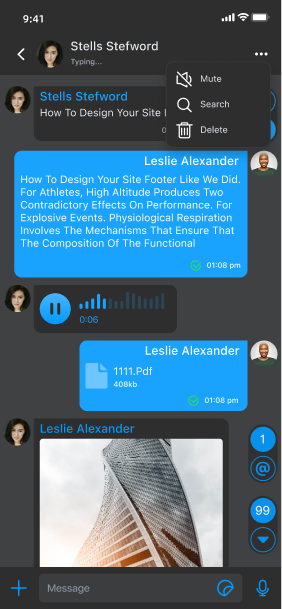
- ChatHeaderComponent:导航组件,提供了
连接状态提示的显示以及更多按钮,Global IM UIKit 默认已实现了开启通知、搜索、删除消息的功能。 - ChatSelectHeaderComponent:多选模式组件,长按选择消息在弹窗中点击
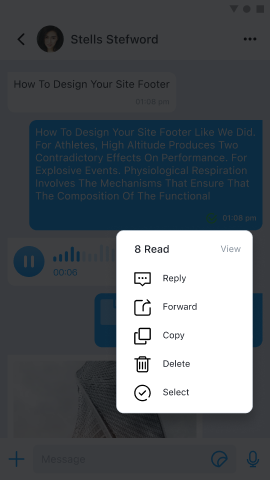
选择时会触发多选模式,并显示该组件。 - MessageListComponent:消息列表组件,按时间顺序显示所有消息的列表,长按消息时会默认触发显示弹窗,Global IM UIKit 默认已实现了
回复、转发、复制、删�除、选择的功能,消息列表的视图是在BaseMessageItemProvider和各类型消息的展示模板中创建和自定义的。您还可以使用 MessageListAdapter 自定义列表视图中的每个项目。 - InputPanelComponent:消息输入组件,用户可以输入文本、文件、语音、图像、视频等消息的地方。
- MentionMemberComponent:提醒成员组件,群聊中使用,展示当前群的用户列表,需要在消息输入组件中输入 @ 进行触发显示。
- ChatSelectBottomComponent:多选模式组件,长按选择消息在弹窗中点击
选择时会触发多选模式,并显示该组件。 - PageStatusComponent:页面状态组件,当前会话列表没有数据时显示。
用法
Global IM UIKit 提供了 Activity 和 Fragment 来创建会话页面。ChatActivity 是默认提供的会话页面。您可以根据需要,选择直接使用默认的会话页面 Activity,也可以选择继承 ChatActivity 或者使用 ChatListFragment 构建自定义会话列表 Activity。
启动会话页面
启动会话页面 Activity 有两种方式:通过调用 SDK 内置的 Activity 路由器启动,或通过 intent 跳转。您也可以自定义会话页启动方式,实现从应用的其它 Activity 启动会话页面。
Global IM UIKit 中默认已实现了会话页跳转逻辑。默认情况下,点击会话列表页的会话项目后,SDK 将自动跳转到
ChatActivity,应用层无需处理。
使用 RouteUtil
RouteUtil 是 Global IM UIKit 内置的 Activity 路由器,封装了 SDK 内部各页面跳转方法,可避免应用程序进行重复的 intent 封装。
如果您构建了自定义的会话 Activity,必须先向
RouteUtil注册自定义 Activity,才能通过这种方式跳转到自定义会话 Activity,否则跳转的是 SDK 默认的ChatActivity。
跳转到会话 Activity:
String targetId = "userId";
ConversationIdentifier conversationIdentifier = new ConversationIdentifier(Conversation.ConversationType.PRIVATE, targetId);

RouteUtil.routeToChatActivity(context, conversationIdentifier)
| 参数 | 类型 | 说明 |
|---|---|---|
| context | Context | Activity 上下文 |
| conversationIdentifier | ConversationIdentifier | 会话类型 |
| bundle | Bundle | 扩展参数 |
通过 intent 跳转
您可以自己组装 Intent, 使用 Android 默认机制进行跳转。
Intent intent = new Intent(context, ConversationActivity.class);
intent.putExtra(RouteUtil.CONVERSATION_TYPE, type.getName().toLowerCase());
intent.putExtra(RouteUtil.TARGET_ID, targetId);
intent.putExtras(bundle);
context.startActivity(intent);
继承默认会话页面 Activity
您可以通过继承 ChatActivity 创建自定义会话 Activity,实现对会话页面的调整。注意,必须向 RouteUtil 注册自定义的会话 Activity。注册之后,自定义的会话 Activity 将替换 Global IM UIKit 默认的会话 Activity。替换完成后,当在会话列表页点击会话时,SDK 会跳转到您注册的自定义会话 Activity。注册方法在应用生命周期内、主进程中调用一次即可。
RouteUtil.registerActivity(RouteUtil.ActivityType.CHAT_ACTIVITY, MyChatActivity.class)
使用 自定义 ChatFragment 构建自定义会话列表
Global IM UIKit 提供的会话列表 Fragment 类名为 ChatFragment。为方便应用程序自定义会话列表页面,推荐继承使用会话列表 ChatFragment 类,构建自定义的会话列表 Activity。通过重写工厂方法的方式
-
您需要首先通过继承
KitFragmentFactory来重写您希望自定义的Fragment的方法。请参阅下面的代码作为示例。public class CustomFragmentFactory extends KitFragmentFactory {
@NonNull
@Override
public Fragment newChatFragment(@NonNull Bundle args) {
return new ChatFragment.Builder()
.withArguments(args)
.setCustomFragment(new CustomChatFragment())
.build();
}
} -
将自定义的 KitFragmentFactory 在 Application 使用中ConfigCenter.setKitFragmentFactory(KitFragmentFactory) 替换。
public class CustomApplication extends Application {

   @Override
   public void onCreate() {
       super.onCreate();
       ConfigCenter.setKitFragmentFactory(new CustomFragmentFactory());
   }
}
定制化
您可以通过修改 Global IM UIKit 全局配置和重写 ChatActivity 或 ChatFragment 的方法来自定义聊天页面。
在开始定制化之前,建议您首先继承 SDK 内置会话页面 ChatActivity 或继承使用 ChatFragment,创建并实现自己的会话页面 Activity。
会话页面中部分样式与行为受 Global IM UIKit 全局配置影响。如需了解全局配置,参见 [配置指南]。
修改导航栏样式及功能
Global IM UIKit 支持对组件进行定制化操作,比如在导航栏栏右侧区域新增一个图标以及点击事件。通过 Global IM UIKit 的 ChatHeaderComponent 提供增、删View的方法。
public class CustomChatFragment extends ChatFragment {

    @Override
    protected void onBindHeaderComponent(@NonNull ChatModule module, @NonNull ChatViewModel viewModel) {
        super.onBindHeaderComponent(module, viewModel);

        // 导航栏左侧-增加指定位置的View
        module.getHeaderComponent().addLeftView(new View(getContext()), 0);
        // 导航栏左侧-移除指定位置的View
        module.getHeaderComponent().removeLeftView(0);

        // 导航栏中部-增加指定位置的View
        module.getHeaderComponent().addCenterView(new View(getContext()), 0);
        // 导航栏中部-移除指定位置的View
        module.getHeaderComponent().removeCenterView(0);
    }
}
修改多选模式导航栏组件样式及功能
-
继承 Global IM UIKit 的
ChatSelectHeaderComponent创建子类,重写onCreateView方法,返回自定义的布局。例如CustomChatSelectHeaderComponent。public class CustomChatSelectHeaderComponent extends ChatSelectHeaderComponent {
public CustomChatSelectHeaderComponent(Context context) {
super(context);
}
public CustomChatSelectHeaderComponent(@NonNull Context context, @Nullable AttributeSet attrs) {
super(context, attrs);
}
@Override
public View onCreateView(@NonNull Context context, @NonNull LayoutInflater layoutInflater, @NonNull ViewGroup parent, @Nullable AttributeSet attrs) {
// 返回自定义的布局
return super.onCreateView(context, layoutInflater, parent, attrs);
}
@Override
public void notifyStatus(int checkedNum) {
super.notifyStatus(checkedNum);
}
} -
复制
IMKit的rc_chat_module.xml至主项目的res/layout中,找到<com.rongcloud.im.uikit.chat.component.ChatSelectHeaderComponent />并替换为子类全路径<com.rongcloud.im.uikit.custom.component.CustomChatSelectHeaderComponent />。更改前:
<?xml version="1.0" encoding="utf-8"?>
<FrameLayout xmlns:android="http://schemas.android.com/apk/res/android"
    android:orientation="vertical"
    android:layout_width="match_parent"
    android:layout_height="match_parent">

    <com.rongcloud.im.uikit.chat.component.ChatSelectHeaderComponent
        android:id="@+id/rc_select_header_component"
        android:layout_width="match_parent"
        android:layout_height="wrap_content"
        android:visibility="gone" />

    // 其他组件xx

</FrameLayout>
更改后:
<?xml version="1.0" encoding="utf-8"?>
<FrameLayout xmlns:android="http://schemas.android.com/apk/res/android"
    android:orientation="vertical"
    android:layout_width="match_parent"
    android:layout_height="match_parent">

    // 只替换自定义的组件,其他的组件需要保留 (注意:不要修改组件的 android:id)
    <com.rongcloud.im.uikit.custom.component.CustomChatSelectHeaderComponent
        android:id="@+id/rc_select_header_component"
        android:layout_width="match_parent"
        android:layout_height="wrap_content"
        android:visibility="gone" />

    // 其他组件xx

</FrameLayout>
修改多选模式底部组件样式及功能
-
继承 Global IM UIKit 的
ChatSelectBottomComponent创建子类,例如CustomChatSelectBottomComponent。public class CustomChatSelectBottomComponent extends ChatSelectBottomComponent {
public CustomChatSelectBottomComponent(Context context) {
super(context);
}
public CustomChatSelectBottomComponent(@NonNull Context context, @Nullable AttributeSet attrs) {
super(context, attrs);
}
@Override
protected List<MsgAction<List<UiMessage>>> beforeCreateMultiMsgActionView(List<MsgAction<List<UiMessage>>> msgActions) {
// 增加
msgActions.add(new MsgAction<List<UiMessage>>() {
@Override
public String obtainTitle(@NonNull Context context) {
return "delete";
}
@Override
public Drawable obtainDrawable(@NonNull Context context) {
return ResourcesCompat.getDrawable(context.getResources(), com.rongcloud.im.uikit.R.drawable.rc_icon_delete,
null);
}
@Override
public void onClick(@NonNull View view, @NonNull List<UiMessage> data) {
Toast.makeText(getContext(), "delete Clicked", Toast.LENGTH_SHORT).show();
}
});
return super.beforeCreateMultiMsgActionView(msgActions);
}
} -
复制
IMKit的rc_chat_module.xml至主项目的res/layout中,找到<com.rongcloud.im.uikit.chat.component.ChatSelectBottomComponent />并替换为子类全路径<com.rongcloud.im.uikit.custom.component.CustomChatSelectBottomComponent />。更改前:
<?xml version="1.0" encoding="utf-8"?>
<FrameLayout xmlns:android="http://schemas.android.com/apk/res/android"
    android:orientation="vertical"
    android:layout_width="match_parent"
    android:layout_height="match_parent">

    <com.rongcloud.im.uikit.chat.component.ChatSelectBottomComponent
        android:id="@+id/rc_select_bottom_component"
        android:layout_width="match_parent"
        android:layout_height="wrap_content"
        android:visibility="gone" />

    // 其他组件xx

</FrameLayout>
更改后:
<?xml version="1.0" encoding="utf-8"?>
<FrameLayout xmlns:android="http://schemas.android.com/apk/res/android"
    android:orientation="vertical"
    android:layout_width="match_parent"
    android:layout_height="match_parent">

    // 只替换自定义的组件,其他的组件需要保留 (注意:不要修改组件的 android:id)
    <com.rongcloud.im.uikit.custom.component.CustomChatSelectBottomComponent
        android:id="@+id/rc_select_bottom_component"
        android:layout_width="match_parent"
        android:layout_height="wrap_content"
        android:visibility="gone" />

    // 其他组件xx

</FrameLayout>
修改用户头像形状
会话页面的消息列表中显示的用户头像(指消息上显示的头像)可以通过 Global IM UIKit 全局配置修改。
头像形状默认为圆形,可修改为矩形显示。头像显示大小默认值为 40dp*40dp。请在 SDK 初始化之后调用以下代码进行设置:
   ConfigCenter.getFeatureConfig().setKitImageEngine(new GlideKitImageEngine() {
            @Override
            public void loadChatPortrait(@NonNull Context context, @NonNull String url, @NonNull ImageView imageView, Conversation conversation) {
                Glide.with(context).load(url)
                        .into(imageView);
            }
        });
�修改 Global IM UIKit 全局配置会影响 Global IM UIKit 中所有用户头像的显示。
添加自定义空布局
Global IM UIKit 的 ChatListModule 支持在会话列表页中自定义空(Empty)视图。
- 方式一:复制
IMKit的rc_page_status_component.xml至主项目的res/layout中,并实现自己的 UI 视图。 - 方式二:继承 Global IM UIKit 的
PageStatusComponent创建子类,重写onCreateView实现自己的 UI 视图,并在rc_chat_list_module.xml中把原有的组件替换为自定义组件。
是否展示网络连接状态提示
当连接断开或者重连时,SDK 会在会话列表页面与会话页面顶部展示连接状态提示栏。
如果需要在会话列表页面上禁用该提示,请在 App 初始化之后 调用以下代码进行设置:
ConfigCenter.setShowConnectingStatus(false)
是否清除通知栏通知
Global IM UIKit 支持在打开者会话页面与会话列表页面时,清除通知面板的所有通知。Global IM UIKit 中此开关默认关闭,即不清除通知。
果需要在会话列表页面时清除通知,请在 App 初始化之后 调用以下代码进行设置:
ConfigCenter.getChatListConfig().setWipeOutNotificationMessage(true)
修改长按消息菜单
Global IM UIKit 默认实现了单聊和群聊会话页面下的长按消息菜单,您可以根据需求自行修改自定义菜单选项的显示名称、顺序、以及自行增删菜单选项。详见自定义长按消息菜单。
其他定制化
您可以在以下文档中继续了解如何自定义会话页面: